Showing posts with label FOOD. Show all posts

Sunday, September 18, 2016

Vegan Mac and "Cheese" - GF

People tend to laugh in your face when you say you're having cheese-less mac and cheese...but you know what? "Cheese-less mac and cheese" sounds a whole lot better than "mac and rice milk, Daiya and nutritional yeast"! This recipe is so creamy and rich, yet it takes the same amount of time and effort it takes to make regular mac and cheese and it's much better for you!


I won't lie to you. This recipe does NOT taste like Kraft Dinner. I have yet to try a vegan mac and cheese that does, but frankly, after already following a dominantly plant-based diet for a few months, when I tried KD again, it tasted much more greasy, salty, and fake than I remembered. So, no. This recipe does not taste like plasticky, processed junk food. It tastes more akin to a gourmet Parmesan mac and cheese that you would order in a fine Italian restaurant. It is so thick and rich, yet still light and fresh. You'll feel energized and satisfied after eating it, instead of the usual heaviness and sleepiness that tends to accompany boxed mac and cheese.


I include cubed tomato and a bit of tomato paste in my mac and cheese recipe, but feel free to omit it. I find that the added acidity helps cut through the richness of the dish. Look at it as the healthy version of putting ketchup on your mac and cheese. I use brown rice pasta, which is gluten-free, but use your own preferred pasta type and shape! This recipe also uses nutritional yeast. This yeast is chock full of vitamin B12 and has a light cheesy taste. Don't be intimidated by this ingredient. It's actually quite easy to find, usually in the natural foods section of your grocery store. I use Bob's Red Mill Large Flake.   


Makes 4 servings
Ingredients:
- 2 cups cooked brown rice pasta
- 2 tsp vegan butter (eg. Earth Balance)
- 2 tsp tapioca starch (or cornstarch or AP flour)
- 1 1/2 cup rice milk (nut milks are fine, too, but they make it more sweet)
- 3/4 cup shredded vegan cheddar cheese (eg. Daiya)
- 1/4 cup nutritional yeast
- pinch of salt
- 1 tsp lemon juice
- 1 tsp cumin
- 1 tsp chili powder
- 1 tsp garlic powder
- 1 tsp onion powder
- 1/4 cup diced tomato (drained), optional
- 4 tsp tomato paste, optional
- paprika, to serve

Method:

1. In a small saucepan, melt the butter over medium heat. Whisk in the starch/flour. Let darken for about 5 minutes, whisking often.

2. Slowly whisk in the milk. Leave to thicken, whisking often. It should be suitably thick after roughly 10 minutes, but if it gets too thick, thin it out with more milk. If it's too thin, leave it a little longer.

3. Remove the white sauce from the heat. Whisk in the cheese substitute and yeast. After they're well mixed in and the mixture is smooth, stir in the salt, lemon, and spices.

4. Pour the "cheese" sauce over the pasta. Add in the tomato, if using, and stir it all up. Sprinkle with paprika and serve!


Enjoy your "mac and rice milk, Daiya and nutritional yeast"!
   
Share:

Tuesday, July 19, 2016

Kale-Watermelon Juice


The benefits of kale are outstanding. The vitamins and minerals jam-packed into these funky green leaves are amazing for nourishing your body, inside and out. However, it has quite a strong and distinctive flavourful that I personally find difficult to pair with in smoothies and juices. I find many fruit and veggies to taste rancid or sour when paired with kale, or they completely cover up the kale flavour (I want to complement the kale, not hide it!). 

Enter the watermelon. Watermelon is quite sweet, which both contrasts and complements the mineraly taste of the kale, yet the fruit is mild enough that it doesn't overwhelm the kale. Plus, Watermelon is nearly all water and is not as carb-dense as other fruits. Side note: people usually think that fruit smoothies are super "healthy" but there's a surprising amount of sugars in them. Even if the sugar is from a fruit, it can still mess with your blood levels!


The juice is so simple to make. You literally just blend together a large handful of kale and about 1 1/2 - 2 cups of watermelon. That's it. It's so simple! 

I also prefer to add in some extra goodness, particularly gogi berries and Chia seeds. The Chia seeds thicken up the juice as they expand, so the mixture has a more smoothie-like texture.


This juice is so refreshing on a hot day and an awesome way to sneak in some greens for any kid or adult who claims to "hate" kale!
Share:

Monday, June 27, 2016

Chewy, Gooey Ginger Molasses Cookies


Without a doubt, we make a lot of molasses cookies in my house. Gingersnaps, Long Johns, Gingerbread, we love it all! Molasses and ginger inspires smokiness, spiciness, sweetness and some serious Christmas nostalgia! As soon as these go in the oven and the amazing smell wafts out, I instantly feel like going sledding, singing carols and decorating a tree. Though the flavours are very wintery, I bake these beauties year-round and trust me, they're still just as tasty!


Makes 50 cookies (I usually freeze half for later)
Ingredients:
- 1 1/2 cups butter
- 1 cup granulated sugar
- 1 cup brown sugar
- 2 eggs
- 4 tsp ground ginger
- 2 tsp cinnamon
- 1 tsp ground cloves
- 1 tsp ground cardamom (optional)
- 2 tsp baking powder
- pinch of salt
- 1/2 cup molasses (Fancy grade for a sweeter cookie, Cooking grade for a more robust flavour)
- 4 cups flour
- 1 cup granulated sugar or demerara sugar, in a small bowl/dish

Method:

1. Preheat oven to 350°F.

2. Cream together butter and both sugars in a large mixing bowl.

3. Crack in eggs and beat until well incorporated.

4. Mix in all spices, baking powder and salt. Stir in the molasses.

5.  Gradually, stir in the flour until it's all incorporated.

6. Shape large spoonfuls of dough into 1 1/2 inch balls. Roll balls in the dish of sugar to coat the outside.

7. Place balls on a baking sheet lined with parchment paper and bake for 10-12 minutes. DO NOT OVERBAKE, otherwise cookies will not be chewy, nor gooey and I'll be very disappointed in you!


Share:

Tuesday, May 31, 2016

Victoria Sponge Cake

When it comes to birthday cakes, there are a lot of options! Chocolate, vanilla, cupcakes, ice cream cakes, and even cookie cakes! There are tons of decoration choices, too. Turn on the TV at any moment and you can always find some sort of reality show that documents truly insane cake designs. If you want a life-sized cake of yourself for your birthday, you can totally find someone who can make it. But when my birthday rolls around each year, I prefer a very simple, old-fashioned favourite: a strawberry shortcake.


There are a variety of methods you can use to make strawberry shortcake. I've tested versions with a sweet biscuit base, a shortbread cookie base, chocolate-infused whipped cream, and recipes that use only fresh strawberries in the filling. In my opinion, it's hard to mess up the classic combo of strawberries and cream, so these were all pretty good. But my favourite version is a recipe by Irish chef and vlogger Donal Skehan. His sandwich uses a base of vanilla sponge cake and a heavenly filling of whipped cream and jam. The original recipe can be found here. I added a few tweaks here and there to suit my and my family's tastes, but the product is still amazing! It also happens to be super easy to make and requires very few ingredients. The measurements of flour, butter and sugar are all equal so it's super easy to memorize. If you cut the sponge into individual circles with a cookie cutter, it is the perfect no-fuss dessert to take to social gatherings. The first time I brought this to a family reunion, it was the hit of the day and everyone was begging for the recipe!


Of course, you don't need a special occasion to make this cake. Whip it up on any summer's eve and enjoy a slice. Or two. Or five.


Makes 1 tall, fluffy, creamy, fresh, AMAZING cake
Ingredients:
- 1 cup sugar
- 1 cup butter
- 4 eggs
- 1 tbsp vanilla extract
- 1 cup flour
- 1 pinch of salt
- 1 tsp baking powder
- 1 tsp baking soda
- 1 cup whipping/double cream
- 1 cup of your favourite strawberry jam (I use one homemade by my grandmother)
- 5-6 fresh strawberries, plus extra to decorate
- icing sugar (to decorate)


Method:

1. Preheat oven to 350°F.

2. In a large bowl, cream the sugar and butter together with an electric mixer until pale yellow.

3. Mix in the eggs one at a time so the mixture doesn't split. Add in the vanilla extract.

4. Using a hand mixing spoon, delicately fold in the flour, baking powder and baking soda. If you find the batter is too thick, add in a tablespoon or so of milk.

5. Grease two 8 inch springform pans after lining the bottoms with cutout circles of parchment paper. Divide the mixture between the cake pans and bake for roughly 20 minutes each, until golden brown on top. Let cool before handling.

6. Whip the cream in a cold bowl. *Some people do not like the taste of true cream and prefer a sweetened version. If this is you, add a splash of vanilla extract and half a cup of sugar when whipping.*

7. Spoon the jam over the bottom layer of the cake. Dollop the cream on top of the jam. Thinly slice a few strawberries and arrange them in a single layer over the cream.

8. Place the top cake layer over the strawberries and press down a little until gooey jam and luscious cream ooze out the sides. Pile extra strawberries on top and sprinkle a dusting of icing sugar over the top. Enjoy!
Share:

Tuesday, May 10, 2016

Banana Coconut Oat Muffins - Vegan

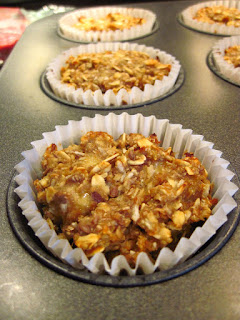
The texture of these muffins is gorgeous. The oats are soft and the banana melts in your mouth like caramel, but the coconut and chia seeds add a nice little crunch. Serve with some chopped mango to really play up the tropical vibe of the banana and coconut.


Makes 6 muffins
Ingredients:
- 2 cups oats
- 1 1/2 cups almond milk
- 1 mashed banana
- 3 tbsp chia seeds
- 1/4 cup unsweetened shredded coconut
- small drizzle of date syrup


Method:

1. These muffins could not be any simpler to make. Chuck all of the ingredients into a bowl and mix until incorporated. Place the mixture into a lined muffin tin and bake at 350°F for 15-20 minutes until pale golden brown.

Share:

Monday, May 9, 2016

Mini Meatloaf


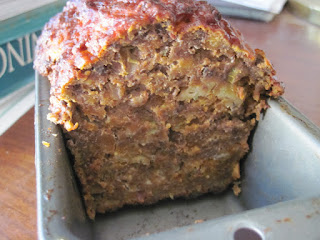
I personally don't really enjoy meatloaf. It's one of those things that either you love or you hate and it's just not for me. However, my father and niece love it and they absolutely adore this recipe. It's moist and flavourful and can easily be personalized to suit their individual tastes. I prefer making mini tins so I don't have to make a massive loaf for only two people. If you like leftovers or are cooking for more people, double the recipe to use in a normal sized loaf tin.


Makes 1 mini loaf tin (serves 3)
Ingredients:
- 1 cup breadcrumbs or crushed saltines
- 1/4 cup chopped parsley
- 1/4 cup milk
- drizzle of olive oil
- 1/2 onion
- 2 stalks celery
- 3-4 slices bacon, cooked and chopped
- 450 g (1 lb) of minced/ground meat (my family likes a blend of beef and pork)
- 1 tsp garlic powder
- 2 eggs
- salt and pepper
Sauce:
- 1/4 cup ketchup or tomato paste
- 1/4 cup of your favourite barbecue sauce (I like Diana's Chicken and Rib sauce)
- 1/8 cup brown sugar
- 1 tsp Worcestershire sauce
- 1 tbsp cooking molasses (optional, but adds a deep, smoky taste)

Method:

1. Preheat the oven to 400°F.

2. Combine the crumbs and parsley in a bowl. Stir in milk and leave to absorb.

3. Meanwhile, drizzle some olive oil into a hot pan and soften the onions and celery. Set aside to cool.

4. Alright, time to get your hands dirty! Place the softened vegetables, meat, bacon, and garlic in the bowl with the crumb mixture. Use your hands to break down the meat and mix everything together.

5. Whisk the eggs in a small bowl until slightly frothy. Mix into the other ingredients and season well with salt and pepper.

6. To prepare the sauce, mix all of the ingredients in a clean bowl. Make sure the brown sugar is well incorporated.

7. Place meat  mixture into an oiled loaf tin and brush a bit of sauce over the top. Bake for 1 hour, or until a thermometer placed in the centre reads the appropriate temperature for your selected meat.

8. Let cool slightly and serve with the remaining sauce.
Share:

Tuesday, March 29, 2016

Old-Fashioned Carrot Cake with "Cinnabon Icing"


When it comes to desserts, my family has a hard time agreeing on what to have. Cake, cookies, chocolate, vanilla...no one can ever seem to agree. But one sweet treat my family will always agree on is a good ole carrot cake. Granted the issue of additions comes up (raisins? walnuts? pecans? all of the above???), but in the end, everyone always loves this basic version bursting with warm, spiced carrot. I recently ramped up the icing recipe to create a seriously indulgent, A-M-A-Z-I-N-G frosting that tastes just like eating a cinnabon...I promise your friends and family will be asking you to make a giant batch of it just for them to eat straight out of the bowl!


Carrot Cake
Makes 9 large squares or 12 smaller rectangles
Ingredients:
- 1 cup flour
- 1/4 cup granulated sugar
- 1/4 cup brown sugar
- 1 tsp baking powder
- 1 tsp baking soda
- pinch of salt
- 1 heaped tbls cinnamon
- 1/2 tsp pumpkin pie spice
- 1/2 tsp cardamom (my super special secret ingredient! Shhh...)
- 1 egg
- 1/2 cup vegetable oil
- 1 splash vanilla
- 1/2 cup crushed pineapple (roughly drained)
- 1/4 cup shredded coconut (optional)
- 1 1/2 cup grated carrot
- 1/2 cup other  additions, if desired

Method:

1. Preheat oven to 350°

2. Combine flour, sugars, baking powder and soda, salt cinnamon, pie spice and cardamom in a bowl.  Mix thoroughly.

3. Incorporate egg, oil and vanilla.

4. Add in pineapple, coconut and carrot, as well as additions, if using. Stir only until combined.

5. Pour mixture into greased 8 inch x 8 inch square baking pan. Bake for 40 minutes.


"Cinnabon Icing"

Ingredients:
    - 250 grams cream cheese
    - 1/2 cup butter
    - 1 1/2 cup confectioner's sugar
    - 1/4 tsp vanilla
    - 1 tsp pineapple juice (or lemon juice)
    - 1 tsp cinnamon

Method:

1. Cream all ingredients together using electric mixer/beaters.

2. Spread over cooled cake. Or eat with a spoon. Your choice.


Share:

Wednesday, March 16, 2016

Easter Brunch Vegan Carrot Cake

Carrot cake for breakfast?! Yup, that's right. This Easter, I'm making cake for breakfast. This carrot "cake" actually is so moist and rich that it actually takes on more of a pumpkin pie texture and tastes AMAZING! This recipe can be made vegan by eliminating the baking soda and baking powder and, while it may not be the healthiest breakfast ever, it is still much healthier than a regular, full-fat carrot cake dripping with icing and oil. It is full of vitamin and mineral rich foods that combine into a rich, ultra-moist "cake" with the exact same flavours as the original for a delicious, decadent way to start your holiday!


I do not make an icing for this cake because I feel that icings are too sweet for breakfast, but feel free to make your own! I enjoy these little darlings with a bit of jam spread on top and some tea. What a lovely start to the holiday!


Makes one 8-inch round cake
Ingredients:
- 1 1/2 cups oat flour (DIY by using a blender to grind whole oats into powder)
- 1 tsp baking soda (eliminate for vegan version)
- 2 tsp baking powder (eliminate for vegan version)
- dash of salt
- 2 tsp cinnamon
- 1/2 tsp nutmeg or pumpkin pie spice
- 1/2 tsp cardamom (optional)
-  1/2 cup unsweetened applesauce
- 1/4 cup maple syrup
- 1/4 cup honey
- 1 cup shredded carrots
- 1/4 cup shredded coconut
- 1/4 cup almond milk, plus more as needed

Method:

1. Preheat oven to 350°F.

2. Combine flour, baking soda and powder(if using), salt, and spices in a medium mixing bowl.

3. Mix in applesauce, maple syrup and honey. Thoroughly combine.

4. Stir in carrots and coconut. Pour in almond milk. Add more milk to loosen the batter, if necessary.

5. Pour mixture into an 8-inch round pan that's been greased with coconut oil. Bake for 55 minutes until golden brown and a toothpick inserted in the center comes out clean.

6. Let cool in the pan for 30 minutes. Turn out and serve.

The moist, dense texture of this cake resembles pumpkin pie, but tastes just like carrot cake.
Pumpkin pie + carrot cake= BEST BREAKFAST EVER!!!


Share:

Friday, March 4, 2016

Blueberry Super Smoothie


I absolutely adore this smoothie. It is super yum AND super good for you! It's so refreshing on a hot day or after a sweaty workout and gives you half of your daily recommended fruits and veg. The blueberries and gogi berries have a TON of antioxidants and the spinach is full of amazing vitamins and minerals. I love adding a few extra spoons of protein powder if I'm enjoying this after the gym. A natural property of Chia seeds is that they absorb liquid  and expand, so maybe leave them out if your not planning on drinking the smoothie straight away, otherwise it will get super thick and turn into a fruity jelly...


Makes 1 large glass or 2 small glasses to share!

Ingredients:
- 1/2 cup frozen blueberries
- 1 sliced frozen banana
- 1 GIANT handful spinach
- 1 cup orange juice
- 1 tsp cinnamon
- 1 tsp ground flax seed
- 1 tsp maca powder
- 1 tsp hemp protein powder
- 1 tsp chia seeds

Method:
Just chuck all of the ingredients into a blender and blend! Add more juice, if needed.


Share:

Thursday, March 3, 2016

Triple "S" Stir-fry


The three S's of this stir-fry are "Sweet'n'Sour'n'Spicy"! It's a simple dish that's filling and delicious, but takes less than half an hour to make. It's also an excellent way to use up leftover rice. The beautiful trio of flavours provide a rich depth to every mouthful. Balance out the flavours to your personal preference. If you like spice, add more spice. If you like sour, add more sour. Personalize it to your taste!


Makes 4 portions

Ingredients:
- drizzle of olive oil
- 1 large onion, roughly chopped
- 1 green bell pepper, halved lengthwise and sliced
- 1 red bell pepper, halved lengthwise and sliced
- 4 carrots, sliced into discs
- handful of mushrooms, sliced
- 1 clove of garlic, crushed
- juice of 1/2 a lemon
- juice of 1 lime
- large drizzle of honey
- 1 tsp garlic powder
- 2 tsp chili powder
- 1/2 to 1 tsp cayenne, to taste
- pinch of salt
- pinch of pepper
- 4 cups prepared rice

Method:

1. Heat the olive oil in a hot pan.

2. Toss in the onion, peppers, and carrots and cook until soft.

3. Stir in mushrooms and crushed garlic.

4. Pour in the lemon and lime juice to get some awesome sizzling action going!

5. Drizzle a spoonful or two of honey across the top of the veggies and mix in.

6. Sprinkle in the garlic, chili and cayenne powders, as well as the salt and pepper. The honey will help the spices really stick to the veg.

7. Let simmer 1-2 minutes, then serve hot over rice.


Share:

Monday, February 29, 2016

Feel-Good "Fro-Yo"

Unless you're some kind of superhuman, you are going to crave ice cream from time to time. Or every single day, if you're me! If only ice cream were healthier...
Maybe it can be! You can still get that luscious, creamy, cold hit of richness without the health consequences or the expanded waistline. All you need is fruit. You can be lactose-intolerant, coeliac, on a plant-based diet, a paleo diet, whatever. I dream of a world where everyone can eat as much ice cream as they want!!! And thanks to this healthy little treat, it can happen.

The recipe is as simple as this:

1. Blend frozen fruit in a food processor or blender with a little bit of liquid to make it smoother.

That's it. That's all there is to it. In the end, you get a creamy, cold bowl of utter deliciousness that satisfies your ice cream tooth(you know you have one, too!). Play around with different combinations of fruits and liquids. If the fruits aren't creamy enough, add in a bit of avocado(fresh, not frozen!) until you reach the right consistency. Add in spices and spreads like cinnamon, cocoa, honey or even some superfood powders for an extra little boost.

I really enjoy a simple mix of Banana and Cinnamon with some almond milk, but here are some of my other fave combinations:

Mango-Peach
- 2 parts Mango, 1 part Peach, 1 part Banana, a splash of Water

PBB&J
- 3 Bananas, a few Strawberries, 1 tbs Peanut Butter, a splash of Almond Milk

Chocolate
- 1/2 Avocado(fresh), 2 Bananas, 1 tsp Cocoa/Cacao powder, a splash of almond milk

Enjoy!
Share:

Saturday, February 27, 2016

Baked Apple Cinnamon Porridge Cups

These amazingly delicious mini porridge bakes are hearty and filling, but their size makes them easy to just grab and go on busy mornings. They are bursting with fruity goodness for a satisfying and nutritious way to start the day. Bake a large batch and keep in the fridge for a week or freeze and thaw as needed.  

Serve warm or cold, plain or topped. I personally like them warm with some Greek yogurt, fresh fruit and a drizzle of honey on top: YUM! 


Makes 12 cups
Ingredients:
- 2 cups oats (I use steel-cut and old-fashioned)
- 1 1/4 cups almond milk
- 2 small apples
- 1 banana
- 5 dates (or 1/2 cup any dried fruit)
- cinnamon
- 1 tbs any nut butter
- pinch of salt
- drizzle of maple syrup (or honey)

Optional superfood add-ins for extra goodness!
1-3 tsp each:
- Maca powder
- Hemp protein powder
- Chia seeds

Method:

1. Preheat oven to 400°F.

2. Combine oats and milk in a mixing bowl.

3. Chop the apples, banana and dates into small chunks. Experiment with different sizes to see what you like. I love biting into a giant chunk of sweet, tender apple!

4. Add the fruit to the oat mixture and stir in as much cinnamon as you like, as well as the nut butter, salt, maple syrup and any optional add-ins.

5. Spoon the mixture into large muffin tins that have been greased with coconut oil or cooking spray.

6. Bake in the oven for about 15 minutes, until the tops turn golden brown. Turn out and enjoy!

Share:

Friday, February 26, 2016

Shepherd's Pie


Here is a recipe for my hearty Shepherd's Pie, perfect for a cold winter's night! The garlic in the potato topping makes this farmhouse classic even more divine. This recipe is very special to me, as it is the first real dish I ever cooked on my own from scratch. You can mix and match ingredients, depending on what you prefer or the kind of diet you follow. Remember, at the end of the day, you're the one eating it, so personalize it!

A beautiful, garlicy, fluffy, yet crunchy mashed potato topping


Ingredients:
- olive oil
- 1 onion, chopped
- 3 celery stalks, sliced
- 3 carrots, halved lengthwise and sliced
- 2 lbs ground meat/meat substitute (I use a 50/50 beef/pork mix)
- 2 tbs Worcestershire sauce
- 2 tbs crushed tomato (ketchup works, too!)
- 2 cloves garlic, crushed
- 2 cups beef or veggie stock
- 2 tbs flour
- dash salt and pepper
- 1 cup frozen peas
- 1/2 cup frozen corn
- 5-6 large potatoes
- 4 cloves garlic, whole and peeled


Method:

1. Soften onions, celery and carrots in a large, hot pan with a drizzle of olive oil.

2. Make sure the pan is really hot and add the meat and cook fully through.

3. Mix in Worcestershire sauce, tomato, and garlic. Gradually, stir in stock. Bring to a simmer and stir in flour. Sprinkle in salt and pepper.

4. Partially cover meat mixture and let it continue to simmer on low for 45 minutes.

5. While the meat is bubbling away, bring the potatoes and garlic to a boil in a pot of heavily salted water. Cook until tender when pierced.

6. Preheat the oven to 350°F

7. Drain the potatoes and garlic and mash them together, adding a little milk, cream or butter, if you like!

8. Pour the meat mixture into a deep baking dish. Round, square, rectangular, just make sure it all fits! Even out the meat across the bottom and season with salt and pepper.

9. Dollop those amazingly garlicy potatoes over the meat and smooth evenly. Use a fork to fluff the potatoes and make a pattern on top(I usually opt for a crosshatch design. Get creative!). Season with salt and pepper.

10. Bake in the oven for roughly 30 minutes, until the potatoes begins to crisp into a lovely golden brown colour. Serve and share!


Share: